Translate

このブログを検索

2014年9月12日金曜日

オルタンスとヴィオレット制作3 -ジャケット編-

Hortense and Violette  part.3 - jacket -


本日はジャケット制作の過程をお伝えします。
Today I will tell you the process of making jackets .


床に置くとずいぶん不格好に見えますね(´ヘ`;)
着るとちゃんとなります。
They look quite shapeless when they are put on the floor(´ヘ`;)
But they will be great when you put them on.


オルタンスとヴィオレットの服は、
元々がイラストなので構造が分かりにくいのですが、
諸先輩方のコスプレのお写真を拝見しながら考えた結果
腕部分のオーガンジーをジャケットに直接つける事にしました。
The structure of Hortense and Violette costumes is difficult to understand because they originally came from an illustration.
After going through many photos of other cosplayers,
I decided to attach the arm organdy directly to the jacket.


では作業過程をご説明します。
Now I will explain the work process.


【材料】
・オーガンジー各色
・ベロア各色
・丸いボタン各色
・ベロア黒の切れ端(ヘッドドレス用の残りで可)
・ボレロ2着
[Material]
· Organdy blue and purple color
· Velour blue and purple color
· Round buttons blue and purple color
· Velour black remainings (the rest of the head dresses)
· 2 Boleros


ん・・・ボレロ2着?
と思われた方、はい!
 ... 2 boleros?
Yes!


100%まるまる全部作る気がなかったので、
土台として使えそうなものはないかとABABさんを彷徨っていたら
フォーマルドレスのコーナーに如何にも使えそうなボレロを発見!
Since I didn’t intend to make bolero from scratch,
I wandered around ABAB store to seek for something suitable.
There, I found a really usable boleros in the formal dress section!


これなら自分で作るより確実に早い!安い!うまい!ヽ(´▽`)ノ
ということで、こちらをもとにジャケットを作る事にしました。
By using them, the process will be Faster, Cheaper and More beautiful than I made them myself!ヽ(´▽`)ノ
So I decided to make jackets using this bolero.


このボレロの襟、裾、袖の部分に
各色のベロアをフリルにして付けました。
I put the frills of the velour of each color to the collar, hem and sleeve of this bolero.


ではまず襟から。
At first I’ll start explaining with the collar.


1、ベロア各色をフリルにしてベロア黒の切れ端に縫い付ける
1, make the frills of colored velour and sew them to the piece of black velour.


ミシンの上糸と下糸の調節で作るフリルだと細かすぎて綺麗にならなかったので
手縫いでフリルにしたものをミシンでベロア黒の切れ端に縫い付けました。
When you make the ruffles using sewing machine, they will not be beautiful and the gather will be too close.
So first you should make the frills by hand-sewing, and sew them to the piece of black velour by sewing machine.


縫い付けたら、手縫いの糸を外してベロア黒の余分な部分は切り落とします。
After putting them together, remove the thread of hand-sewing basting and cut off the extra piece of black velour.


2、襟にミシンで縫い付ける
2,  sew the frill to the collar with a sewing machine.


既存の襟の縫い目に重ねて縫います
sew it to overlap the seams of the black collar


きわきわを縫わないといけないので待ち針を多めに
put a lot of marking pins to sew at the edge.


気をつけて縫うとこのように
if you sew carefully, the seem becomes like this


元からあった襟のように見えます
It looks like an original collar and not as added one.


縮れている箇所を黒い襟と縫い合わせてバランスを整えます
arrange it carefully and fix it to the black collar.


裾もほとんど襟と同じです。
Process of making hem frill is almost same with one of the collar.


こちらはミシンで作ったフリルを使用。
ベロア黒の切れ端にミシンで縫い付け、
更にそれをボレロの裾に手縫いで目立たないように縫っていく。
Here I used the ruffles made with sewing machine. 
First sew the frill to the piece of black velour by sewing machine, 
and sew to the hem of the bolero by hand-sewing not to stand out.


袖は若干違いまして。
Sleeves are slightly different. 

1、色ベロアをフリルにせずにそのまま縫い付けます。
1, sew the colored velour without making ruffle.


後でゴムを入れる隙間を作る為に、
袖のベロアが色ベロアを挟み込むように縫います。
In order to make a space to put in the elastic band later, 
put them together to sandwich the color velour.


2、オーガンジーの裁断部に手芸用ボンドを塗って乾かす
2, put the fabric glue to the cut line of the organdy and dry it.


白く見える部分がボンドを塗った部分。
こうする事で裁断した時にほつれません。
ちょっと裾広がりにするのがポイント。
White line is where I put the fabric glue. 
When done so, it does not fray when you cut along the line. 
The point is making the hem slightly wider.


3、乾いたら裁断
3, when it dried completely, cut it along the line.


4、ミシンで筒状に縫う
4, sew it into cylindrical shape using sewing machine


オーガンジーは生地が薄いのでミシンで縫うと布がよれる事がありますが、
その場合は下に紙を敷いて一緒に縫うと割に縫いやすくなります。
(手間はかかりますが・・・)
Organza may twist when you sew it with a sawing machine, because the fabric is thin and delicate.
And in that case it becomes easier to sew if you sew it by putting a sheet of paper in between. 
(but it took a lot of time and effort...)


5、ボレロを裏返して袖の裏地に縫いつける
5, turn the bolero inside out, and sew organdy sleeve to the hem of the bolero sleeve.


引っ張ったらビリッと行きそうですが気にしない!
You shouldn't keep it in mind that it may tear if it is pulled too strong!


6、ボレロをおもてに返して、1で作った袖の隙間にゴムを入れる
6, turn the bolero inside out, put a elastic band in the space of sleeves made by step1


最後に飾りの丸いボタンをボレロの正面に6つ付けて
Last, attach six round buttons to the front of the bolero for the decoration.


正面でとめるフックを取り付けると完成です。
Attach the hook and loop fastener in order to keep the bolero fastened.
This is finish!


肘を曲げると若干しわになります。
オーガンジーだからしょうがないのかな?
Moving your arms slightly wrinkles the sleeves. 
But that is inevitable for the organdy.


2014年9月4日木曜日

オルタンスとヴィオレット制作2 -お花ボタン編-

Hortense and Violette  part.2 - flower buttons -

はい、ということで今日はお花ボタンについてです。
Well, this time is about the flower button.


前回の記事でお話した通り
サイズ違いのお花ボタンをユザワヤさんで調達、
As I told you in the last article, 
I bought each of big and small flower buttons from Yuzawaya store.


ボタンを真っ黒のまま使うわけにはいかないので、塗料も一緒に購入しました。
青い方の「Horizon Blue」という色名の「Horizon」の部分に、
「まさしくこの衣装を作るのにふさわしい!」と運命を感じ買ったは良いものの。
Since I didn’t want buttons to be black, I bought some paint. 
For the part of the "Horizon", the name of the paint was "Horizon Blue", 
I felt destined to use it. I thought that it’s very appropriate for making this costume.
(Because I made the costume of Sound “Horizon”.)


間違えて水彩絵の具を買ってしまいました・・・(o´_`o)
どうやらすぐ隣にあったポスターカラーと商品札を見間違えたらしく。
I bought watercolors by mistake ··· (o'_`o)
I seemed to misunderstand that a tag of acrylic paint which was next to watercolors was for the watercolors.


いやあ、慣れない事をするときは気をつけないといけませんなあ。
Well, you should pay attention when you buy something for the first time.


しかし、せっかく買ってしまったし、返品するには良い色だし。
ということで、
試しにボタンに塗ってみることにしました。
However, I already bought them, and I didn’t want to return them because they are good colors.
Therefore,
I decided to try painting the button with those colors.


あれ、案外いけそうです。
Look! It is surprisingly OK.


全部塗って乾かす。
Paint them all and dry them.


この時点では、
汗ばんだ手で触ると色が落ちてしまいます。
At this point, 
the color comes off if you touch by sweaty hand.


もちろん洗濯なんかしたら大変な事になりそうです。
It is going to be a big trouble if you put them in washing machine.


という事で、この上から透明のマニキュアを塗ってみました。
So I tried painting the transparent polish on top of the paint.


これも乾かした結果、色落ちせず艶も出ていい感じに。
After drying, they got high gloss finish and the paint will not come off.


これをヘッドドレスの両端とブラウスの首元に使ったのであります。
I used these buttons on both of each end of the head dresses and the neck of blouses.


2014年9月2日火曜日

オルタンスとヴィオレット制作1 -ヘッドドレス編-

Hortense and Violette  part.1 - head dress -


さて、まずヘッドドレスの作り方についてお話ししようと思います。

ヘッドドレスはあごの下で紐を結ぶ形状が多いですが
敏感肌だと紐がチクチクして痛いので
カチューシャ型のものを作りました。

First, I will talk about how to make the head dresses.
Many head dresses have the straps to fasten under the chin.
But straps tingle sensitive skin.
So I made Alice band type.


ヘッドドレスは筒型になっており、
中に細いカチューシャが入っています。

Head dressed have cylindrical shape, 
containing thin Alice band.


真横から見るとこんな感じ。
Side view.


では、非常に非常にざっくりと作り方をご説明します。
I will explain how to make them very very loosely.


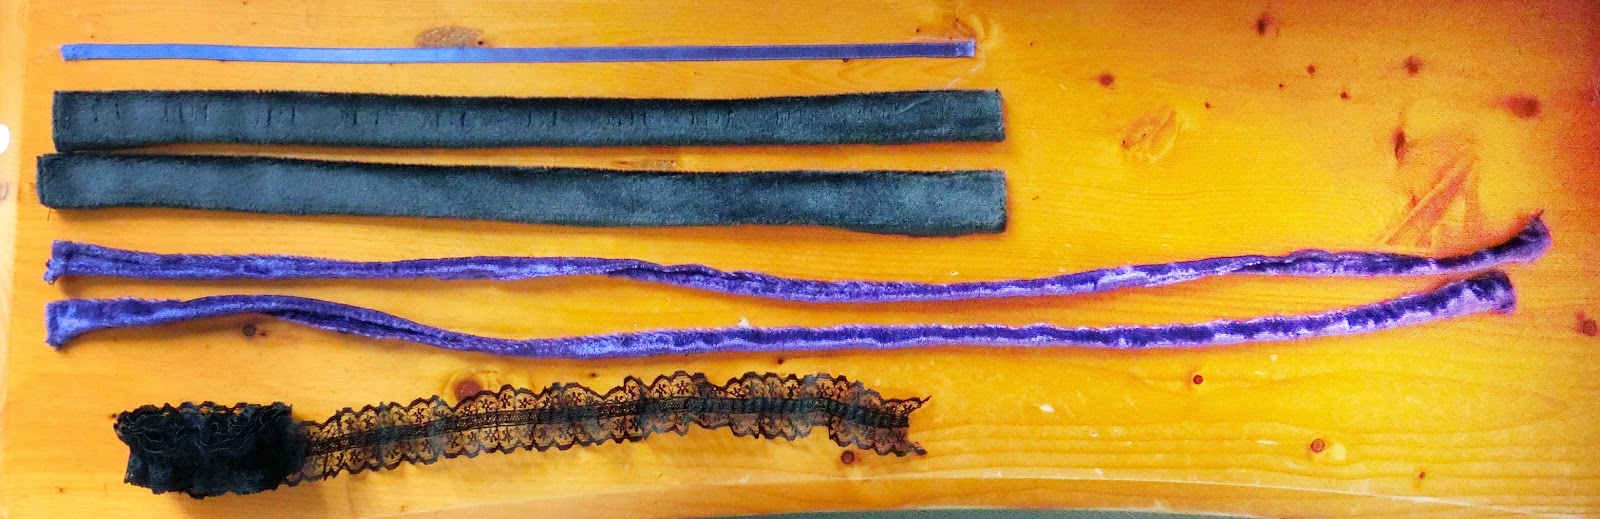
【材料】
 [Material]


  • リボン青・紫(写真より長めに) 各1
  • ベロア黒 各2
  • ベロア青・紫 各2
  • レース
Ribbon, blue and purple (longer than photos)  X 1
Velour black  X 2
Velour blue and purple X 2
 • Lace ribbon X 1


サイズは頭の大きさに合わせて、はい、その、適当に(^ω^)
ベロアはストレッチ素材だと縫いにくいので注意してください。

Sizes are to fit the head, yes, well… appropriately (^ ω ^) 
Please note that the elastic velour is difficult to sew.


あと必要なのは

Another required is

  • お花柄ボタン 各2
flower shaped button X 2


オルタンスとヴィオレットの衣装には、ヘッドドレスの両脇以外に
ブラウスの首元にそれぞれのお花が必要になります。
今回はユザワヤさんでお手頃なお花柄ボタンを見つけたのでこちらを使用しました。

The costumes of Hortense and Violette need each of the flowers in both sides of the head dress and blouse neck.
This time, I used these buttons I found in Yuzawaya store in reasonable price.


本当はオルタンスの花びら(紫陽花なので正確には萼)は4枚ですが、
遠目で見れば分からない、ということで。

Actually, although the number of flower petals used in Hortense’s (to tell exactly it’s calyx of hydrangea) is four, 
we always look at them from a long distance.


こだわる方は造花でもよろしいかと思います。

If you stick to, artificial flowers are of course available.


【作り方】
[Recipe] 


1. ベロア黒に均等に切れ目を入れて、リボンを通す
1. snick in black velour, and pass through the ribbon


リボンの両端はズレないように縫ってとめてください
please sew both ends of the ribbon to fix.


2. レースを中心で二等分に切る
2. cut into two halves by the center of the lace.


3. 1の両側にレースをミシンで縫い付ける
3. sew the lace in both sides of 1 using sewing machine.


おもて面
Surface


裏面
Back


4. もう一つのベロア黒に、ベロア青(紫)のフリルをつける
4. make the blue(purple) velour ruffle and sew it to both sides of another black velour.


おもて面
Surface


裏面
Back


5. 3と4を重ね、手縫いで縫い合わせる
5. put 3 on 4, and sew them by hand-sewing


重ねて待ち針をうつ
fix them with many marking pins


オレンジの点線部分(レースとベロアのきわ)を縫うと、縫い目が目立ちません
If you sew the orange dotted line (outskirts of lace and velour), the seams don’t stand out.


6. 5の両脇に、お花ボタンとリボンをつける
6. put flower buttons and ribbons on both sides of 5.


リボンをちょうちょ結び風に中央でとめて
make the shape like a bow knot and fix it sewing in the middle.


その上にお花ボタンを重ねて縫い合わせます
stitch the ribbon and the button together.


あれ、お花ボタンに色がついてる!と思った方。はい、するどい。
これについてはまた今度お話します。
The color is given to flower button! Yes, you have keen sense.
I will tell you that next time.


本体と縫い合わせる時は、手順3の生地とだけ糸が通るように
(手順4の生地も一緒に縫ってしまうと後でカチューシャが入らなくなります)
When you sew it to the body, pass the thread only with the fabric of step 3. 
(If you sew with the fabric of step 4, it becomes unable to accept Alice band later.)


7. カチューシャを差し込む
7. put the Alice band.


かなり細いものを選びましたが、もう少し太くても大丈夫でした
Although I chose a fairly thin one, it is okay to use slightly thicker one.


縫わずにあけておいた端から入れて行きます
put it from the end which had not been sewn


するするする
smoothly


いっちょあがり(*´ー`)
Now finished! (*´ー`)


正面から見ると若干控えめな印象がありますが、
あんまりフリルが派手だと赤ちゃんの産着みたいになってしまうので
このくらいで落ち着かせました。

When viewed from the front, you may have slightly modest impression,
but, so flashy frills give you the impression like a swaddling baby clothes.
So I allowed to settle in like this.


横から見るとこんな感じです。

リボンがちょっと曲がっているのはご愛嬌。


This is the side view.
I appreciate if you regard the slightly bending ribbon as a charm.

2014年8月23日土曜日

Romanコスプレ −オルタンスとヴィオレット−

Roman Costume play - Hortense and Violette -

soundhorizonのromanに出てくるオルタンスとヴィオレットのコスプレ


人生にはその瞬間にしか作れないものがあると思います。

I think there are things that can only be made at a certain moment in life.


10年来の友人が結婚するという事で
独身時代最後の思い出に、
Sound HorizonのRomanに出てくるオルタンスとヴィオレットのコスプレをしよう!という話になり。

Before my friend of ten year’s got married,
to cherish the moments of her being still single, 
we did costume play of Hortense and Violette which came from the album “Roman” of the artist “Sound Horizon”.


じゃあ私が作るよ(@´ー`)ノ゙
と簡単に言ってしまったが為に半年かけて衣装を作り、
やっとこさ結婚前に間に合って撮った写真をご覧頂いている次第です。

“I’ll make the costumes! (@´ー`)ノ゙” 
I regretted to say so easily.
It took over six months to make these,
and I managed to finish making them before her wedding.
So I can show you these photos.


soundhorizonのromanに出てくるオルタンスのコスプレ


友人(と私)のプライバシーとか肖像権とか、そんなことを考えて
photoshopで顔をアレしています。

On behalf of protecting her (and my) privacy and portrait rights,
I arranged the faces with photoshop.


soundhorizonのromanに出てくるヴィオレットのコスプレ


人の顔って、ほんの少しバランスを間違えると
アンドロイドのような不自然さが生まれてしまうので
目、鼻、口パーツの大きさ、角度、影を慎重に作ったつもりですが
どうでしょ、なじんで見えるかな・・・?

If you mistake the balance even just a little bit when you make faces,
a person's face becomes unnatural like that of an android. 
So I carefully made eyes, nose, the size of the mouth, 
and paid attention to the angle and shadow.
I wonder if you feel strange somehow in these photos.


soundhorizonのromanに出てくるオルタンスのコスプレ


都内某スタジオを借りて撮影したのですが
予想以上になかなか素敵なセットでした。

We took photos in a rental studio in Tokyo.
The studio had quite nice sets and was better than I had expected.


ちなみに写真には雰囲気を出す為にフィルターをかけているので
衣装の実際の色はもうちょっと鮮やかな青と紫です。

Since I put a filter in these photos in order to give the atmosphere,
the actual colors of the costumes are more bright blue and purple.


soundhorizonのromanに出てくるヴィオレットのコスプレ


裁縫をちゃんと習った事はなかったんで完成までに半年かかりましたが、
慣れた方なら1週間くらいで作れるんじゃないでしょうか(゚ー゚;

It took six months to finish making them because I didn’t know how to do.
But if you are used to sewing, maybe it would take about 1 week. (゚ー゚;


次回から
オルタンスとヴィオレットの服作りの作業工程を
何回かに分けてお話しします〜

From the next article,
let me tell you the working process of making clothes of Hortense and Violette divided into several sections.