
Hortense and Violette part.1 - head dress -

さて、まずヘッドドレスの作り方についてお話ししようと思います。
ヘッドドレスはあごの下で紐を結ぶ形状が多いですが
敏感肌だと紐がチクチクして痛いので
カチューシャ型のものを作りました。
First, I will talk about how to make the head dresses.
Many head dresses have the straps to fasten under the chin.
But straps tingle sensitive skin.
So I made Alice band type.

ヘッドドレスは筒型になっており、
中に細いカチューシャが入っています。
Head dressed have cylindrical shape,
containing thin Alice band.

真横から見るとこんな感じ。
Side view.
では、非常に非常にざっくりと作り方をご説明します。
I will explain how to make them very very loosely.
【材料】
[Material]
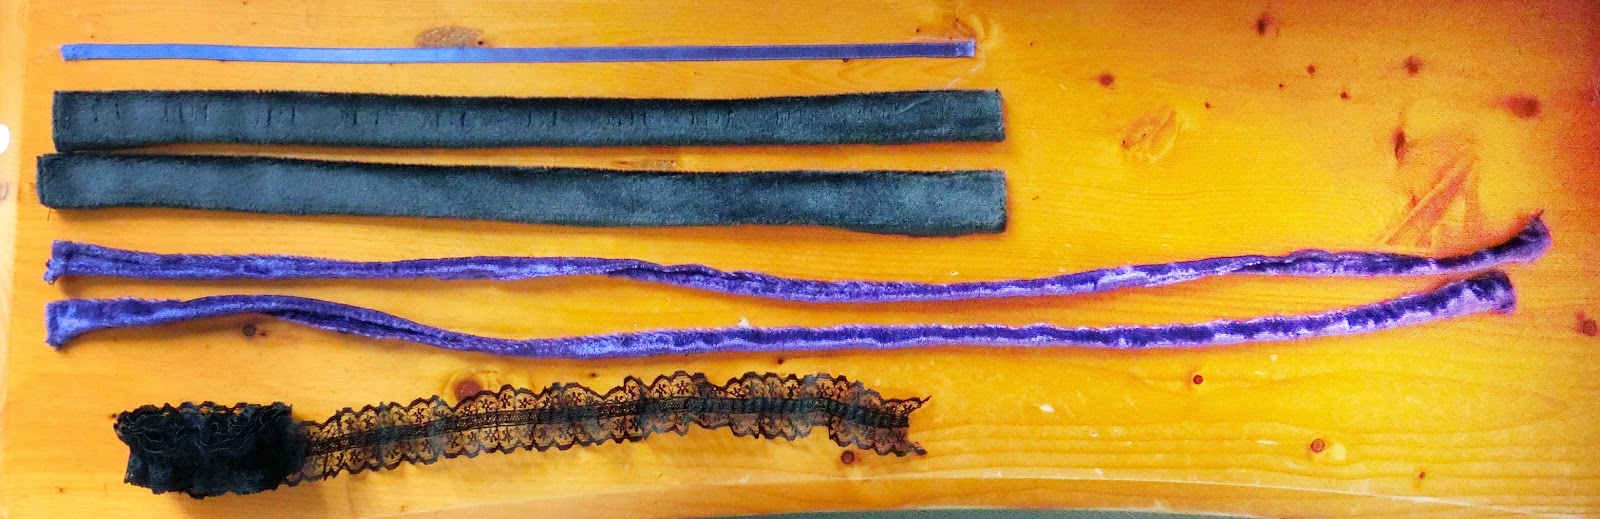
- リボン青・紫(写真より長めに) 各1
- ベロア黒 各2
- ベロア青・紫 各2
- レース
• Ribbon, blue and purple (longer than photos) X 1
• Velour black X 2
• Velour blue and purple X 2
• Lace ribbon X 1サイズは頭の大きさに合わせて、はい、その、適当に(^ω^)
ベロアはストレッチ素材だと縫いにくいので注意してください。
Sizes are to fit the head, yes, well… appropriately (^ ω ^)
Please note that the elastic velour is difficult to sew.
あと必要なのは
Another required is
- お花柄ボタン 各2
• flower shaped button X 2

オルタンスとヴィオレットの衣装には、ヘッドドレスの両脇以外に
ブラウスの首元にそれぞれのお花が必要になります。
今回はユザワヤさんでお手頃なお花柄ボタンを見つけたのでこちらを使用しました。
The costumes of Hortense and Violette need each of the flowers in both sides of the head dress and blouse neck.
This time, I used these buttons I found in Yuzawaya store in reasonable price.
本当はオルタンスの花びら(紫陽花なので正確には萼)は4枚ですが、
遠目で見れば分からない、ということで。
Actually, although the number of flower petals used in Hortense’s (to tell exactly it’s calyx of hydrangea) is four,
we always look at them from a long distance.
こだわる方は造花でもよろしいかと思います。
If you stick to, artificial flowers are of course available.
【作り方】
[Recipe]
1. ベロア黒に均等に切れ目を入れて、リボンを通す
1. snick in black velour, and pass through the ribbon
 |
| リボンの両端はズレないように縫ってとめてください
please sew both ends of the ribbon to fix.
|
2. レースを中心で二等分に切る
2. cut into two halves by the center of the lace.

3. 1の両側にレースをミシンで縫い付ける
3. sew the lace in both sides of 1 using sewing machine.
 |
| おもて面
Surface
|
 |
| 裏面
Back
|
4. もう一つのベロア黒に、ベロア青(紫)のフリルをつける
4. make the blue(purple) velour ruffle and sew it to both sides of another black velour.
 |
| おもて面
Surface
|
 |
| 裏面
Back
|
5. 3と4を重ね、手縫いで縫い合わせる
5. put 3 on 4, and sew them by hand-sewing
 |
| 重ねて待ち針をうつ
fix them with many marking pins
|
 |
| オレンジの点線部分(レースとベロアのきわ)を縫うと、縫い目が目立ちません
If you sew the orange dotted line (outskirts of lace and velour), the seams don’t stand out.
|
6. 5の両脇に、お花ボタンとリボンをつける
6. put flower buttons and ribbons on both sides of 5.
 |
| リボンをちょうちょ結び風に中央でとめて
make the shape like a bow knot and fix it sewing in the middle.
|
 |
| その上にお花ボタンを重ねて縫い合わせます
stitch the ribbon and the button together.
|
あれ、お花ボタンに色がついてる!と思った方。はい、するどい。
これについてはまた今度お話します。
The color is given to flower button! Yes, you have keen sense.
I will tell you that next time.
 |
| 本体と縫い合わせる時は、手順3の生地とだけ糸が通るように (手順4の生地も一緒に縫ってしまうと後でカチューシャが入らなくなります)
When you sew it to the body, pass the thread only with the fabric of step 3.
(If you sew with the fabric of step 4, it becomes unable to accept Alice band later.)
|
7. カチューシャを差し込む
7. put the Alice band.
 |
| かなり細いものを選びましたが、もう少し太くても大丈夫でした
Although I chose a fairly thin one, it is okay to use slightly thicker one.
|
 |
| 縫わずにあけておいた端から入れて行きます
put it from the end which had not been sewn
|
 |
| するするする
smoothly
|
 |
| いっちょあがり(*´ー`)
Now finished! (*´ー`)
|

正面から見ると若干控えめな印象がありますが、
あんまりフリルが派手だと赤ちゃんの産着みたいになってしまうので
このくらいで落ち着かせました。
When viewed from the front, you may have slightly modest impression,
but, so flashy frills give you the impression like a swaddling baby clothes.
So I allowed to settle in like this.
横から見るとこんな感じです。
リボンがちょっと曲がっているのはご愛嬌。
This is the side view.
I appreciate if you regard the slightly bending ribbon as a charm.
0 件のコメント:
コメントを投稿